Non standard printer resolutions
I have received a few requests asking whether it is possible to get !Printers to produce non-standard resolutions. One of the popular makes of inkjet printers is Hewlett Packard, and most of t eir newer models have a 600×300 dpi mode which, at first sight, is not supported by any of the LaserJet printer definition files. Philip Perry suggested a method in his excellent series 'U ing and Manipulating Printout Files' in Archive 13.10 page 76. This method involved modifying a 600 dpi LaserJet4 printout file to a sprite, then scaling the sprite to half its height and conver ing it back to PCL. Another method Philip has produced involves stripping out alternate lines of data from the PCL file, hence producing, effectively, a 600×300 dpi resolution file. Both o these methods are effective but Philip wondered if !Printers could be coaxed into 600×300 dpi. Well, after some experimentation, the answer seems to be yes.
Using !PrintEdit
I wondered how many users have experimented with printer definition files using !PrintEdit. It is a powerful utility which is supplied with all versions of !Printers, the only problem being that the ser needs to know a large amount of codes and details for their printer. Or do they?!
Let me make one thing clear from the beginning. Before 'having a go' at modifying any printer definition file, make a backup copy of the original in some far away directory, even on a floppy o two, because if you get in a mess, your printouts might never be the same!
!PrintEdit is designed to produce bit image printer definition files only! These files have undergone several changes in their structure so only use the !PrintEdit that came with your version of !Pri ters. This is especially true for versions 1.62 onwards. These versions of !Printers will work with older pdfs, but once you have used !PrintEdit, the pdf will only work with 1.62 onwards. This means that I tend to use the !PrintEdit that came with version 1.53 since these pdfs will work with 1.62 onwards as well.
Modifying a LaserJet4 Pdf
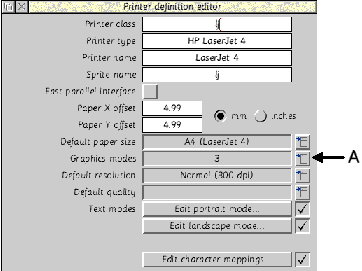
Double-clicking on !PrintEdit installs the usual style iconbar icon. Now find, in the HP directory, inside the Printer definitions directory, the LasJet-4 pdf. Drag this file onto the !PrintEdit icon ar icon. The main window opens as shown below. Most of this window needs no explanation but move the mouse pointer onto the icon marked A in the screenshot below and click once to open a Graphics Menu.

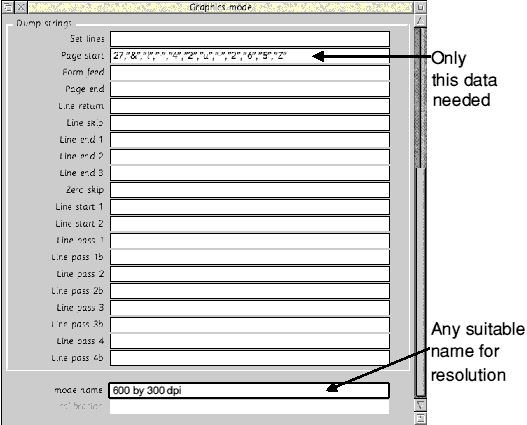
Select the high (600 dpi) option. A large Graphics Mode window containing all the details for this resolution opens. Make a note of all the settings, i.e. which buttons have ticks and the values of all the writable icons. Be especially careful when copying the string of characters in the Page start writable icon. Close this window by clicking on the X window icon (top left). Open the Gr phics menu again but this time select New Resolution.
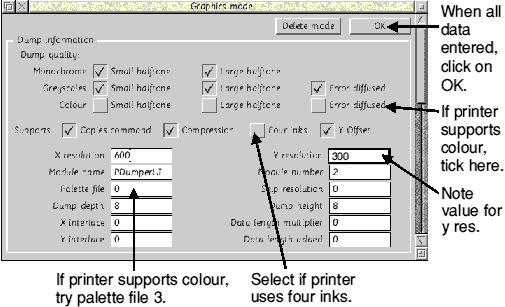
The Graphics Mode window opens. Set all the settings as seen in the 600 dpi resolution, but type in 300 in the Y resolution writable icon.
Move down to the bottom of the window and type in the mode name writable icon something like 600×300 dpi (deleting anything previously there). Click on the OK button at the top of the window. S e the two pictures below to check the details.

Top of graphics mode window

Lower half of graphics mode window
You will now see the Graphics modes number is one higher and your new mode is included in the Graphics Mode menu.
Click <menu> with the pointer inside the main window to open a small PrintEdit menu. Move across the Save option to open the usual Save as window. Save the new version of the pdf somewhere conv nient.
This pdf can now be loaded into !Printers as usual; it will install a Laserjet printer with the extra selectable graphics mode. I cannot guarantee this method will work with every bit-image printer; t only seems to work with Laserjets because the page start string is the same in every mode and the PdumperLJ module takes care of all other codes.
Adding colour
You might have noticed in the above example that the 600×600 dpi resolution is only for black and white printing. You could experiment by clicking on the colour buttons, together with the four nks button, and changing the palette file number to see if your colour printer will work at this resolution. See the diagrams above for details.
I have used this technique for Philip and it seems to work for his Deskjet.
PostScript printers
It is much easier to alter the pdf for PostScript Printers. You cannot use !PrintEdit. Instead open up a PostScript pdf in, say, Edit. If you find it is garbled and starts with SQSH as the first four characters, you must first use !Squash to decompress it (remembering to change its filetype to Squash first). When you open the pdf, look for the following lines:
pxres: 300
pyres: 300
pxres_halftone: 300/8
pyres_halftone: 300/8
These lines can be altered to produce 600×600, 600×300, 1200×1200. Just alter the res and res_halftone lines to suit, e.g.
pxres: 600
pyres: 300
pxres_halftone: 600/8
pyres_halftone: 300/8
should give a 600×300 resolution.
pxres: 600
pyres: 600
pxres_halftone: 600/8
pyres_halftone: 600/8
should give a 600×600 resolution.
But remember to check your printer manual to see if the resolution is supported! Don't change anything else in the PostScript PDF!
I hope the above will answer some of the questions I've been asked.
| Source: | Archive Magazine 14.2 |
| Publication: | Archive Magazine |
| Contributor: | Brian Pickard |