Ben Summers explores how to go it alone with the Outline Font Manager
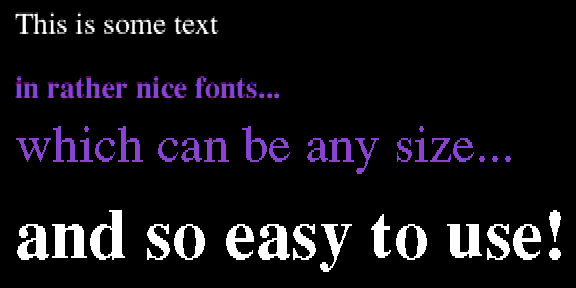
One of the most striking features of RISC OS programs is the anti-aliased text that they use. It's clear, easy to read, fast to draw and looks good in any size - no other operating system on any machine offers such good font handling. What you may not have realised is that they are incredibly easy to use in your own programs thanks to the Outline Font Manager.
The font manager is located in rom on RISC OS 3 machines, and on disk under RISC OS 2. Although they can do similar things, the RISC OS 3 program has several new features, a new font format and an improved application interface.
This article describes how to use the new font manager, as the advantages of using its features outweigh the disadvantage of incompatibility with the old one.
In common with the rest of RISC OS, the font manager has been written to minimise the amount of work the programmer has to do to perform this common function. It can handle most of the text functions - change font, colour or size at any position within a string, and even justify it - all you have to do is tell it what to do.
Control is via a comprehensive set of SWIs. The interface is quite complex if you want to do anything fancy, but simple things are easy to achieve. I'll go through those first, and then explore some of the more interesting effects.
The fonts are stored as outlines, which is a description of what each character looks like, and the font manager renders them as bitmaps to be drawn on the screen.
To speed up the drawing process, it keeps outlines and bitmaps in the font cache, an area of memory. You're probably familiar with the effect small and large font caches have on the speed of redraw.
The first thing you need to do when writing a program is to check the version of the Font manager, and complain with an error message if it is too old. You use the code:
SYS "Font_CacheAddr" TO version%

IF version% < 300 THEN ERROR 0, "Font manager too old"
Fonts are a bit like files - you open and use them, and then close them when you have finished This process helps the font manager maintain the font cache so that it won't throw away a font which is in use when the cache becomes full. To open, or find, a font, you would use code like:
fontid$ = "Homerton.Medium"
size = 16
SYS "Font_FindFont",,fontid$,size*16,size*16,0,0 TO handle%
The font identifier (fontid$) is the directory name of the font without the font path. It's probably the name the user sees as well - though under RISC 05 3 it may be different. However, the directory name of the font will always work.
Once you have found your font, you need to set its colour. I recommend you use ColourTrans to do this as it simplifies colour selection considerably. The call is:
SYS "ColourTrans_SetFontColour",handle%,fore%,back%,14
fore% and back% are the foreground and background colours respectively. They are defined as &BBGGRR00 (blue * 16777216 + green * 65536 + red * 256, each colour ranges from 0 to 255). The 14 at the end tells ColourTrans the maximum number of anti-alias colours you want it to use - 14 is the maximum to get the best rendition of text.
If writing a single-tasking program you can set the palette for use with fonts, as the default doesn't allow anti-aliasing in 16-colour or less modes. Use a line like:
SYS "Font_SetPalette",,bcol%,fcol%,offset%,back%,fore%,&65757254
The first three parameters specify which logical colours are programmed. bcol% is the first one, set to the background colour, and fcol% the first of the graduated colours. Both are in the same format as the ColourTrans colour.
The magic number at the end identifies the two colours as true 24-bit colours to maintain compatibility with future hardware. offset% is the number of colours above fcol% to program.
Both back% and fore% are the colours as in the ColourTrans call. After using this call, use ColourTrans to set a font to use the colours. In 256 colour modes, you must never change the palette, but always use ColourTrans.
After setting the colour, you can then paint the text on to the screen with:
text$ = "Hello World!"
SYS "Font_Paint",handle%,text$,784,x%,y%
This paints the text held in text$ on to the screen at x%,y%. The magic number, 784, is the plot type. This particular number tells the font manager that the position is specified in OS units, and to automatically kern the text. It also ensures that other, more complex features are not used. I'll describe some of them later on.
When you have finished with the font, you close, or lose, it with the line:
SYS "Font_LoseFont",handle%
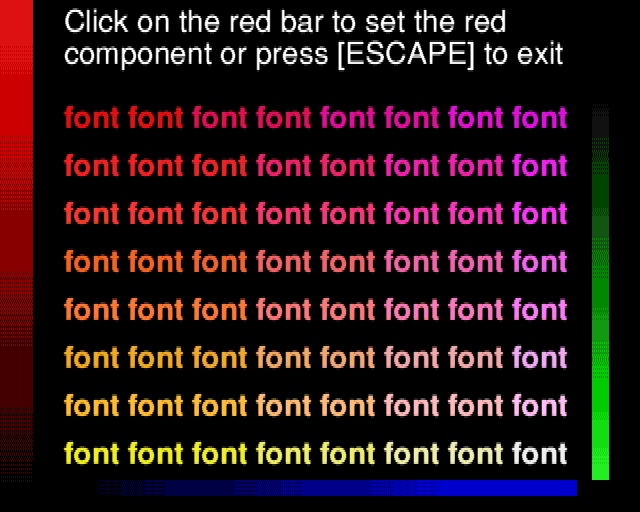
Example1 on the MegaDisk, demonstrates the use of fonts by painting a few on to the screen and Example2 shows the different colours of fonts which are available in 256 colour modes. Go into Mode 15 or 21 before running this program.
There are two strategies about when to find and lose fonts. The first is probably the easiest by simply finding it when you want to use it, and lose it directly after the Font_Paint call, but this doesn't allow the font manager to make the most effective use of the font cache.
A better way is to find the font when you first need it, and then lose it when you finally finish with it. However, this strategy complicates the programming, and you have to write error handling routines to lose all the fonts when you get an error and the program terminates.
If your program allows you to select fonts, you will need to provide a menu of them to choose from. The font manager provides a call to scan the list of available fonts. Under RISC OS 3 it is cached in memory and quick to access but under RISC 05 2 it is read from disk each time it is requested.
The following code will print a list of all the available fonts. You will obviously need to change the PRINT fontid$ line to one which stores the string somewhere, perhaps in an array. There is no limit to the number of fonts allowed, so make sure your program can cope with large quantities.
DIM fontid 256
c% = 0
REPEAT
  SYS "Font_ListFonts",,fontid,c%,256 TO ,fontid$,c%
  PRINT fontid$
UNTIL c% = -1
The program ListFonts shows this code in action.
If you are writing a multi-tasking program, you will just create a menu structure out of this list - but if you are running under RISC OS 3 the font manager will construct a font menu with submenus for each font, and then decode the menu into a font identifier when a selection is made from it.
The same call, Font_ListFonts, is used. It is called twice, first to find the amount of memory needed, and secondly to create the font menu. It's recommended that you recreate the font menu every time you want to display it - which you will need to do if you want entries to be ticked.
You should create it when the WIMP returns the mouse click to create the window, and then free the memory used when the menu is closed. Message_MenusDeleted (&400C9) is sent to your task whenever a menu you created is closed but not when a menu selection is returned.
SYS "Font_ListFonts",,0,&80000,0,0,0 TO ,,font_menu_size%,,font_menu_indirected_size%
DIM font_menu% font_menu_size%
DIM font_menu_indirected% font_menu_indirected_size%
SYS "Font_ListFonts",,font_menu%,&280000,font_menu_size%,font_menu_indirected%,font_menu_indirected_size%,font_tick$
The menu definition is then at font-menu%, and this can be passed to Wimp_CreateMenu without further modification.
font_tick$ is the fontid of the font to tick in the menu. If you don't want any font ticked, pass an empty string.
You should replace the DIM statements with another method of allocating memory, for example using a heap as described in the December 1993 issue, otherwise you can't free the memory claimed to create the menu. The memory should be freed when a selection is made or the menu closed.
The font manager also provides a SWI to decode the menu structure it has created when a font is chosen from it. However, it returns a font identifier rather than a font name, and as such contains rather more information than is actually required. To find the name to present to the user, you should use Wimp_DecodeMenu:
DIM fontid% 256, fontname% 256
SYS "Font_DecodeMenu",0,font_menu%,selection%,fontid%,256 TO ,,,fontid$
SYS "Wimp_DecodeMenu",,font_menu%,selection%,fontname%
fontname$=$fontname%
The DIMs should be performed at initialisation of the program, selection% is the menu selection returned by the WIMP, but only for the font menu. For example, if the font menu is a sub-menu off the root menu, you should pass the second word onwards to these two calls.
You should use fontid$ to find fonts, and fontname$ to tell the user which font you are using as they could be very different when a machine is being used in non-English speaking countries.
Perhaps the most exciting addition to the new font manager is the ability to display rotated or transformed text. Using a standard transformation matrix and a pair of translation coordinates, it can distort text by changing the axis - either skewing, rotating or doing both to the text. However, the most useful is rotation, and only this is covered here.
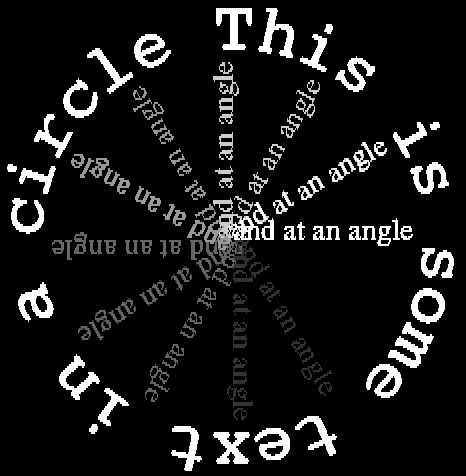
For information on other transformations, see any good textbook on matrix mathematics. To paint text at x%,y% rotating it by an angle theta (in degrees) anticlockwise, use:
DIM matrix% 24
matrix%!0 =  COSRAD(theta) * 65536
matrix%!4 = -SINRAD(theta) * 65536
matrix%!8 =  SINRAD(theta) * 65536
matrix%!12=  COSRAD(theta) * 65536
matrix%!16= 0
matrix%!20= 0

SYS "Font_Paint",font%,text$,848,x%,y%,,matrix%
matrix% should be dimensioned at initialisation of the program.
When you are using fonts, you often need to know how big a piece of text is, for example, when centering a piece of text. To find the x and y size of the text in text$, use:
DIM coords% 64

coords%!0 = 0
coords%!4 = 0
coords%!8 = 0
coords%!12= 0
coords%!16= -1
SYS "Font_ScanString",handle%,text$,&40320,-1,-1,coords%
SYS "Font_ConverttoOS",,coords%!28 - coords%!20, coords%!32 - coords%!24 TO ,x_size%,y_size%
The coordinate box is first initialised to ensure that the correct answer is returned and then the length of the string is found. This is returned in the coordinate block as a bounding box, specified in millipoints, and is finally converted to OS units to give the final result in x_size% and y_size%.
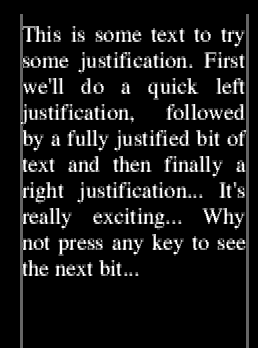
When you want to print a paragraph of text in a font, the font manager will help by working out where to split the text, and will fully justify it. I'll run through the separate parts of this process. Example 4 shows how to put the bits together.
First, you must place the text into a block of memory so that the font manager can easily work on the text, then find its length.
DIM text% 256
$text% = text$
length%= LEN(text$)
At the start of the following code, x% and y% are the coordinates of the top left of the block of text, width% is the width of the column and spacing% is the size of each line in OS coordinates. In the code, cy% is the current y coordinate of the text to be plotted, split% is the number of characters to be plotted in the line and loc% is the location within the text of the first character of the line.
DIM cb% 64
loc% = 0
cy% = y%
REPEAT
  cb%!0 = 0
  cb%!4 = 0
  cb%!8 = 0
  cb%!12 = 0
  cb%!16 = 32
  SYS "Font_Converttopoints",,width%,1024 TO ,jx%,jy%
  SYS "Font_ScanString",font%,text%+loc%,&40320,jx%,jy%,cb% TO ,split%
  split% -= text% + loc%
  SYS "Font_ConverttoOS",,cb%!28 - cb%!20, cb%!32 - cb%!24 TO ,text_x%, text_y%
  REM plot text here
  loc%+=split%+1
  cy%+=spacing%
UNTIL loc% >= length%
The line REM plot text here should be replaced by the command to plot the text. The text to be plotted is given by MID$(text$,loc%+1,split%). The size of the text line is given by text_x% and text_y% in OS units, and using this you can justify it as you require. The simplest form of justification is left justified text. The plot command in this case is:
SYS "Font_Paint",font%,MID$(text$,loc%+1,split%),784,x%,cy%
Fully justified text is a little more complex as you have to first move the graphics cursor to the right hand side of the column of text to tell the font manager where the edge of the frame is. You also have to remember not to use fully justified text for the last line of text. The code is:
MOVE x%+width%,cy%
IF (loc%+split%+1) <= length% THEN
  SYS "Font_Paint",font%,MID$(text$,loc%+1,split%),785,x%,cy%
ELSE
  SYS "Font_Paint",font%,MID$(text$,loc%+1,split%),784,x%,cy%
ENDIF
Right justification is quite simple, and just plots the text as in the left justification but indenting it so that the end touches the right hand side of the frame.
SYS "Font_Paint",font%,MID$(text$,loc%+1,split%),784,x%+width%-text_x%,cy%
You can leave out the Font_ConverttoOS call if you don't need to know how big the text is. Example4 uses the minimum code necessary for each type of justification.
Click here to download the example files
| Source: | Acorn Computing February 1994 |
| Publication: | Acorn Computing |
| Contributor: | Ben Summers |