Dr Wimp p14
First steps to 'Visual Dr Wimp'?
By the time you read this, a new version of the Dr Wimp package (3.57)
will have been released, and the reason for the above heading is because
it includes a major upgrade to the already popular Dr Wimp utility
!Fabricate (now at Version 2.00).
Earlier in the year, there was a flurry of interest in 'visual Wimp
programming', and this prompted me to give some thought as to how
!Fabricate might be extended to start to fulfil this need within Dr Wimp.
I was hoping for some specific ideas from users (which is the best
way to progress) but none has come yet - so the upgrade is the result of
my own assessment of what most users are likely to want when they start
to put together a new wimp application using Dr Wimp.
So, what does !Fabricate do?
The general purpose of !Fabricate is to provide, automatically, a fully
working wimp application with its !RunImage file containing a skeleton
Basic listing doing the things you have chosen with !Fabricate and ready
for your further development. The key to how useful this is depends
mainly on how much of the !RunImage skeleton is filled out automatically
for you.
The new release of !Fabricate allows you to:
- have an iconbar icon;
- have an iconbar menu, with proper quit action. (Either a standard
two-item 'Info/Quit' menu or a custom iconbar menu with up to 16
user-defined items.);
- have a standard info window with customised entries (linked, if you
wish, to an 'Info' item on the iconbar menu);
- drag your own window template file into !Fabricate so that it is
automatically copied into the output application and the windows within
it are automatically loaded by your new application on start-up;
- choose one of these windows to be opened in the output application,
with an iconbar click.
So, here's a typical user's sequence:
- Start !Fabricate in the usual way and click on its iconbar icon to
open its main window. (This is a fairly narrow vertically-scrolling
window with five distinct sections from top to bottom.)
- Work down the window making your choices by mouse-click and a few
keyboard entries. For example:
Enter the app's name
Decide that the app will have an iconbar icon on start up.
Decide that the app will have an iconbar menu.
Decide that you want this iconbar menu to have six items with names of
your choice.
Enter the text for these menu items in a subsidiary window.
Decide that you want to display the usual info window (with text
entries of your choice) as a sub-menu off the 'Info' item of your custom
iconbar menu. (It doesn't have to be the first item.)
Decide that you do want to load your own window templates file, so drag
it to the !Fabricate window.
Decide that you want one of the windows in this dragged file to open
from an iconbar click in your new application. Choose this window from
the menu provided.
- Click the 'OK' button and drag the resulting Save icon to where you
want your application to be located...
...and in a couple of seconds - Hey Presto! - there it is!
- Open up the application and you'll see something like this:
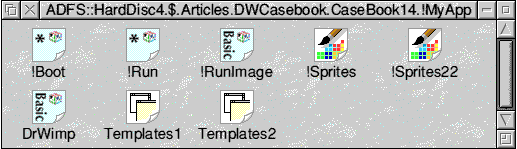
- Now double-click on your new application's file icon and prove to
yourself that it does what you said you wanted ('cos you don't really
believe it can be this easy, do you?)!
Give it a try and let me know what you think - and, just as important,
tell me what I should add next!
Dr Wimp
I felt the above was more newsworthy than to give you the details of the
changes in Dr Wimp itself. I will save them for next time.
However, in response to a suggestion by Stephen Murphy, my website
now contains a separate page with the detail of the changes.