
Back in the second part of this series, I put together a very simple WIMP program which did nothing more than display an error box and be generally rather annoying.
While very simple, it did show how easy putting together a WIMP program really is.
From here on in, we will be expanding on the application listings (called c.part1a, c.part1b and c.part1c on the Archive monthly disc), but along with that, incorporating the libraries we have built up.
The first on our list of what to do is the definition of a window. Later on, we will see how this is done using a template file, but for now, we need to know how to create a window. The WIMP provides us with a simple method of doing this, the call Wimp_CreateWindow. This does require a parameter block (memory block) passed in.
The block looks like this:
Wimp_CreateWindow block
   Offset   Controls
   0        Visible area, minimum x
   4        Visible area, minimum y
   8        Visible area, maximum x
   12       Visible area, maximum y
   16       Scroll x offset
   20       Scroll y offset
   24       Handle to open window behind
   28       Window flags
   32       Title foreground and frame
   33       Title foreground
   34       Work area foreground
   35       Work area background
   36       Scroll bar outer colour
   37       Scroll bar inner colour
   38       Title background when input focus claimed
   39       Extra flags (OS 4+ only)
   40       Work area, minimum x
   44       Work area, minimum y
   48       Work area, maximum x
   52       Work area, maximum y
   56       Title bar icon flags
   60       Workarea button flags
   64       Sprite area control block pointer
   68       Minimum width of window
   70       Minimum height of window
   72       Title data
   84       Number of icons in initial definition (0 or more)
   88       Zero or more icon blocks, 32 bytes each.
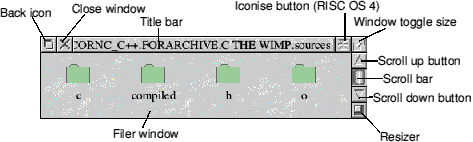
At this point, one aspect of the window needs to be defined - what is meant by the visible and work areas. It is also useful to consider the different parts of a window.
The visible area can be seen as not very large - which it isn't. Take for instance a drawfile. If you set the paper size to be A1, without the zoom function, the work area isn't visible completely on a normal monitor - only a proportion of it is. The same applies to any desktop application.
The RISC OS window is a simple affair; the above diagram shows this.
Given that we have a block to pass into the SWI, again it's far simpler to define a structure to cover this (it is on the monthly disc, h.window). Again, it is included and a memory block allocated to it.
We need now to consider more fully some of the parameters in the block passed to Wimp_CreateWindow - they are not all just text or numbers.
Handle to open window behind
This can have four values:
  -1    top of the stack (window at the front of any others on the screen)
  -2    bottom of the stack (behind all other windows)
  -3    iconised (not visible)
   x    behind the window with handle x
Extra flags byte (OS 4+ only)
If bit 0 is set, this gives the ability to use 24-bit colour in the title bar validation.
Icon flags
This is another 32-bit number, again described on the monthly disc (icon_flags).
There is a program called !Toolkit on the comp.binaries/sources.acorn website which allows the rapid calculation of these two sets of values.
Title data
There are two methods of placing title data on a window, either as text or as a sprite.
The text can either be direct (max of 12 characters) or indirected (placed somewhere in memory, up to 255 characters). The same applies to sprites. These can either be from a sprite area (area of memory holding the sprites) or from the WIMP itself.
For the moment, we will consider the title text to be a simple 12-byte text file.
If you consider the following piece of code (from c.part2a), you can see how we assign memory to this structure and then assign values.
int create_window(int x,int y,int width,int height,int extx,int exty,char *message)
{
 int handle;
 if ((window=malloc(sizeof(win)))==NULL)
 {
  report_error(1,"I can't create the window\0");
  exit(1);
 }
 window->vis_min_x=x;
 window->vis_min_y=y;
 window->vis_max_x=x+width;
 window->vis_max_y=y+height;
 window->scroll_x=0;
 window->scroll_y=0;
We then carry on filling the structure in a similar way and finally, we have the Wimp_CreateWindow call.
Wimp_CreateWindow
in
r1 pointer to block containing the window definition
out
r0 window handle created.
The window handle is a number assigned by the WIMP to the window created.
But this isn't the end of the story. While we've created the window (and received back the window handle), we still have to physically create the window.
In listing c.part2a, this is performed using:
void make_window (int whandle)
Here, we pass over the window handle into a parameter block and into two SWI calls, Wimp_GetWindowState and Wimp_OpenWindow.
Wimp_GetWindowState returns a block containing a shortened down version of the values passed to Wimp_CreateWindow, while Wimp_OpenWindow does as the name implies.
I would recommend that you have a look at the way this has been implemented and the structures used.
Next time, I'll be padding out the poll routine and looking at a couple of events.
| Source: | Archive Magazine 14.8 |
| Publication: | Archive Magazine |
| Contributor: | Paul Johnson |